
Create and Manage My Weekly Timesheets
Background
The process below describes how to manage a users weekly timesheets register and entry form.
Process
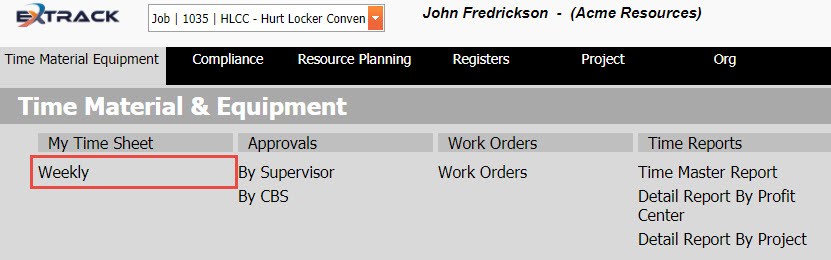
1) Click Time Material Equipment
2) Under My Time Sheet click Weekly
Click on picture to enlarge
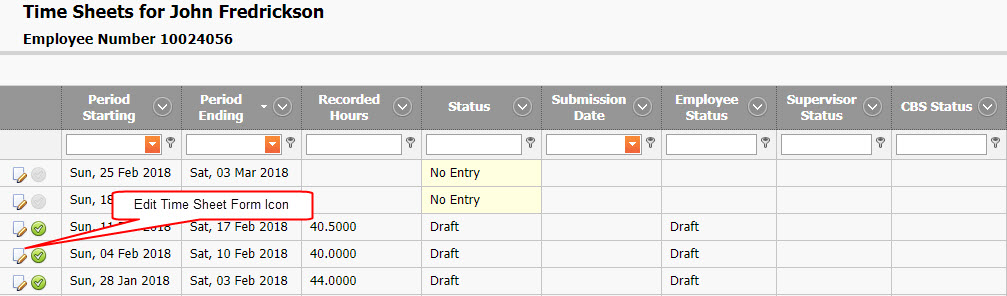
This will display the users time sheet register below.

Click on picture to enlarge
| Field | Example Data | Comment |
|---|---|---|
| Period Starting | Sun, 03 Dec 2017 | Date the weekly data commences from |
| Period Ending | Sat, 10 Dec 2017 | Date the weekly data finishes on |
| Recorded Hours | 48.5 | Total recorded hours for the week |
| Status | Pending | Overall status of the time sheet taking into account
Status’s include
|
| Submission Date | Mon, 12 Dec 2017 | Date User Submitted their time sheet for approval. |
| Employee Status | Approved | Time sheet remains as “Draft” until it is submitted, at this time the status is set to “Approved” (by User). Status include
|
| Supervisor Status | Pending | Time sheet supervisor status will remain blank until the Time sheet is submitted, at this point the time sheet status is set to “Pending”. Status include
|
| CBS Status | Pending | Time sheet CBS status will remain blank until the Time sheet is submitted, at this point the time sheet status is set to “Pending”. Status include
|
| Comments | Displays the time sheet weekly comment field as entered on the time sheet form. |
![]()
Note – Time sheets begin from Sunday 12:00 am through to Saturday 12:00 pm
3) Select the edit icon button in the left hand column of the time sheet register to modify that weeks data.
Click on picture to enlarge
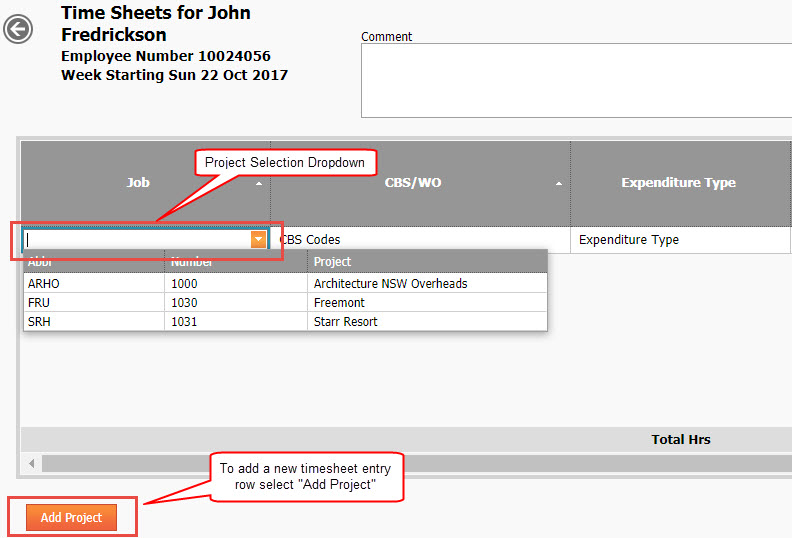
4) Once the time sheet is open, click on the “Add Project” button to add a new row entry for the time sheet.
5) Search for a project by number, abbreviation or title in the project dropdown field in the time sheet.
![]()
Note – if a project cannot be found in the dropdown menu check:-
A) Project has been created
B) Project has a cost breakdown structure (projects without a CBS will not be returned in the dropdown list.
Click on picture to enlarge
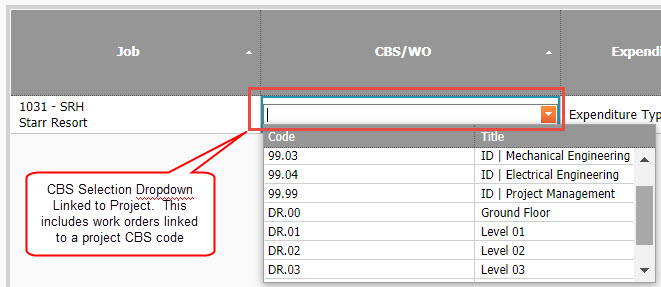
6) Search for the projects CBS (Cost Breakdown Structure) by number or title in the CBS dropdown field.
Click on picture to enlarge
7) Search for the Expense Type
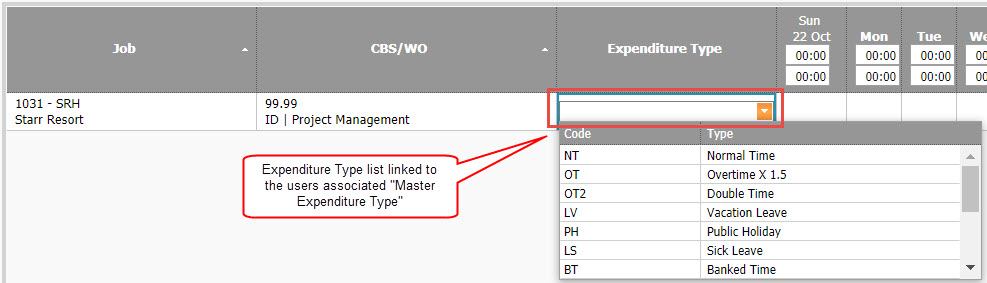
Click on picture to enlarge
The Picture below provides commentary on the features available within the time sheet entry form.

Click on picture to enlarge
Features Include:-
- A back button to the time sheet register, any changes made to the time sheet form when selecting the back button will give you the option to save or discard changes made
- Ability to “Right Click” the mouse on time entry data (hours) and add, edit or delete comments. Cells with comments are displayed with a red triangle in the top right corner
- Hovering the mouse over any cell with a red comment mark will return the comment in a tooltip.
- The full list of comments made on the time sheet can be displayed by clicking Show Detailed Comment List and re-clicking to hide
- Subtotal per column, row and in total are provided at the bottom and right of the data entry form.
- Overall weekly comment field at the top.
- Record Daily Start and Finish Times (as information only and is not linked to the time sheet hours of the days column.)
When the time sheet data is entered select the Save Draft button, or if the draft is finalised the user can Submit Time Sheet for the supervisors and/or CBS managers approval.
Pre-Requisite Requirements
Licensing – users are to be licensed for the Time Material Equipment module, this can be found under Settings then click User Licensing , set a billing account for the user. For more info see Knowledge Base Article -> User Licensing
Roles – users are to be assigned a user role for accessing the My Time Sheet – Weekly menu item. This can be found under Settings – System Security then click Assign User Roles . For more info see Knowledge Base Article -> Assign User Roles
Weekly time sheets require the following menu’s populated for the application to work.
A) Manage Job List. This can be found under Settings – Projects then click Manage Job List . For more info see Knowledge Base Article -> Manage Job List
B) CBS created for Job. This can be found under Projects – Breakdown Structures then click Costs (CBS) . For more info see Knowledge Base Article -> CBS – Cost Breakdown Structure
C) Expense Types created. This can be found under ORG – “Member” Contacts then click Expenditure Types. For more info see Knowledge Base Article -> Expenditure Types
D) Link an Expense Type to a User. This can be found under Settings – Member then click Users. For more info see Knowledge Base Article -> Managing Users